Choosing Expo Exhibition Stands is not simply a matter of picking an attractive structure. The right stand should help visitors understand your offer, approach your team, and move comfortably through the space. A striking display can still fail if the message is unclear or the welcome desk blocks the main aisle. Small details matter.
A useful design principle comes from architect Mies van der Rohe: “Less is more.” He was not an exhibition-industry specialist, but his idea applies to stand planning: every graphic, light, and display should earn its place. That principle is easy to repeat and harder to follow. Teams often add one more screen, product, or slogan, then wonder why the stand feels crowded.
This guide outlines seven practical tips for choosing a stand that fits your goals, venue, and budget. It covers layout, visibility, branding, materials, lighting, visitor flow, and supplier coordination. Picture a compact counter, readable graphics, and an open path to a product demo. These choices can make conversations feel natural. They cannot guarantee leads. Results also depend on your offer, staff, and follow-up. Before committing, compare drawings with the actual floor plan and ask who handles setup, transport, and storage. A polished rendering is helpful. It is not the whole plan.

Before comparing expo exhibition stand designs, define what success means. A stand built for product demonstrations needs different space from one designed for private meetings. Write two or three measurable goals, such as collecting qualified leads, booking consultations, or increasing product trials. Keep them realistic. More visitors do not always mean better results.
Tip: Set the budget early. Include the stand structure, graphics, lighting, furniture, transport, installation, storage, and on-site services. A low initial quote can become expensive when essential details appear later. In my experience, a simple spreadsheet prevents uncomfortable surprises. Leave a contingency reserve of around 10% for changes or urgent requirements. We once underestimated electrical costs. That mistake changed our design choices.
Tip: Compare designs against your goals, not just appearance. Mark the visitor entrance, reception point, demonstration area, and lead-capture station on a basic floor plan. Check walking space carefully. Crowded areas discourage conversation. Also ask how quickly the stand can be installed and dismantled. A beautiful concept is not useful if it exceeds the venue’s height, access, or safety rules. Request clear specifications and written cost details from each supplier. Then compare equal items. This step feels slow, but it improves reliability. You may still choose the wrong layout. Review visitor feedback after the event, and adjust the next plan with evidence.
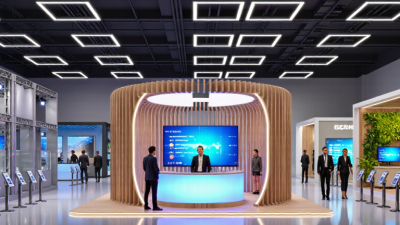
A 3 m × 3 m booth is a common shell-scheme module, but its compact footprint demands careful planning. It offers nine square metres, often with standard walls, fascia, lighting, and flooring. The exact package varies, so confirm the organiser’s technical specification before designing graphics or furniture.
Measure twice. Keep aisles clear.
Place your main message at eye level, where visitors can read it from the aisle. A back-wall graphic can create visual impact without consuming floor space. Use one reception counter, a narrow product shelf, and a small storage area under the counter. Oversized furniture quickly makes this module feel crowded. I have seen attractive displays lose visitors because staff blocked the entrance while discussing leads.
Plan the visitor movement before ordering anything. Leave an open corner for conversations, and avoid placing cases across the front edge. A 3 m × 3 m stand may suit a focused presentation, but it can feel limited for demonstrations or private meetings. Consider a slim screen, lightweight samples, and QR-accessible documents instead of large cabinets. Test the layout with tape on the floor. This simple step often reveals problems that drawings hide.
Check wall heights, electrical points, fire-access requirements, and venue rules with the organiser. Graphics should include safe margins because shell-scheme panels may have visible joins. Bring spare cable ties, cleaning cloths, and printed contact cards. Small details matter. Yet the plan may still need adjustment after setup, especially when neighbouring stands change the available sightlines.
A stand can look open on a floor plan and still feel cramped in person. Measure the clear walking space after counters, stools, and display cases are placed. Under ADA standards, accessible routes are generally at least 36 inches wide, though specific conditions can affect the required width. Confirm current requirements with the venue and event organizer before finalizing your layout. Their aisle rules may be wider.
Keep the route obvious. Avoid placing a sign base or cable cover where visitors turn. Check the narrowest point, not just the main aisle. A tape measure helps. One common planning mistake is measuring between empty walls, then forgetting that a chair sticks out by several inches. We have to admit, that detail is easy to miss. Walk the planned route at a realistic pace, including the approach to counters and demo areas. If two visitors cannot pass comfortably, rethink the furniture placement rather than relying on people to squeeze through. Leave turning and maneuvering space where needed, and keep accessible routes clear during setup and throughout the show. A neat drawing is useful, but a full-scale floor mock-up can reveal awkward corners before they reach the expo floor.
When choosing expo exhibition stands, inspect the finish—not just the frame. A fabric panel, printed laminate, or painted edge can affect fire performance. ASTM International’s ASTM E84 test measures flame spread and smoke development across a material’s surface. In commonly used building-code classifications, Class A corresponds to a flame-spread index of 0–25 and a smoke-developed index of 0–450. These figures are useful, but they do not mean a finish is fireproof.
Tip: Ask for the test report, not only a sales sheet. Check that it names the exact finish, backing, and thickness used in your stand. A certificate for bare board may not cover the printed, coated panel delivered to the show floor. Confirm with the supplier and venue that the tested construction matches the installed one. Small detail. Big difference.
Also check seams, edge treatments, and any applied graphics; these may differ from the tested sample. Keep documentation available during setup, when venue staff may request it. ASTM E84 results describe performance under a specific test method, not every real-world fire condition. A report can look reassuring and still leave questions. Ask what has not been tested, too.
When comparing expo exhibition stand suppliers, look beyond the quoted build price. Ask each supplier to estimate how the layout supports conversations, product demonstrations, and visitor flow. A stand with a clear reception point and accessible meeting space may help staff capture more qualified leads. Still, foot traffic alone is not proof of success. Numbers can mislead.
Agree on what counts as a lead before the exhibition. For example, record a visitor’s company, role, and stated interest in the same way across all stands. Then calculate cost per lead by dividing the full stand cost, including design, transport, installation, and staffing, by the number of qualified leads. Keep the event and follow-up costs separate if they vary. Otherwise, comparisons may look precise but answer different questions.
Conversion metrics add another useful layer. Track how many leads become meetings, proposals, or customers within a consistent follow-up period. A supplier may offer a lower-cost stand that attracts fewer people but creates better conversations. Another may generate a large contact list with little buying intent. Review results from past events where possible, and ask how they were measured. Attribution is rarely perfect; sales cycles can stretch for months, and staff recording habits differ. I would treat estimates as planning tools, not promises, and note where the evidence is thin.
Use this comparison framework to assess stand proposals. The figures below are illustrative planning estimates for a like-for-like 3-day exhibition; replace them with written supplier quotes and results from your own campaigns.
| Tip | Anonymous Stand Option | Estimated Stand Cost | Expected Qualified Leads | Cost per Lead | Lead-to-Meeting Conversion | Estimated Meetings | What to Check |
|---|---|---|---|---|---|---|---|
| 1. Set clear objectives | Option A: Modular inline stand | £8,000 | 80 | £100 | 15% | 12 | Confirm the supplier understands your target audience, lead definition, and event goals before comparing designs. |
| 2. Compare like-for-like quotes | Option B: Custom inline stand | £12,000 | 110 | £109 | 18% | 20 | Check whether design, graphics, furniture, lighting, transport, installation, and dismantling are included. |
| 3. Prioritise useful visitor experiences | Option C: Interactive modular stand | £10,500 | 125 | £84 | 20% | 25 | Ask how demonstrations, meeting areas, and visitor-flow planning are intended to support conversations. |
| 4. Review lead-capture planning | Option D: Compact modular stand | £7,500 | 65 | £115 | 12% | 8 | Agree how leads will be captured, qualified, exported, and followed up; confirm any software or device fees. |
| 5. Check visibility and layout | Option E: Corner stand with open frontage | £14,000 | 150 | £93 | 18% | 27 | Review sightlines, accessible routes, storage, signage positions, and how the layout suits the booked floor location. |
| 6. Verify delivery and compliance | Option F: Custom stand with project management | £16,500 | 160 | £103 | 22% | 35 | Request a schedule, named project contact, venue-rule checks, risk documentation, and a clear process for changes. |
| 7. Compare outcomes, not just price | Option G: Reusable modular stand | £9,000 | 105 | £86 | 19% | 20 | Ask about reuse, storage, refurbishment, and ownership costs across future events, then compare projected conversions. |
Calculation: Cost per lead = estimated stand cost ÷ expected qualified leads. Estimated meetings = qualified leads × lead-to-meeting conversion rate. These estimates exclude staffing, travel, promotional materials, and other campaign costs; actual results vary by event, audience, location, and follow-up.